The version of SPIM that we will be using is xspim, which means,
you will need to be running the X Window System before you can run xspim.
We shall be using Linux machines. To get the X Window System up and running on Linux machines, use your own .xinitrc file or copy the following .xinitrc file into your home directory. This is a basic no frills .xinitrc file. If you already have X Windows running on your system don't bother about this file.
Ok, now that we have the X Window System running, we start the simulator, 'xspim'. To do this type in the following command in a terminal window.
xspim
NOTE: xspim is located under /p/bin and should
be in your PATH. The syntax for setting your path depends on the shell you are using.
To find out which shell you are running, type the command finger
"yourusername" such as "finger scott" and look at the argument for
"Shell:"
For bash shell: For tcsh or csh:
export PATH=$PATH:/p/bin
set PATH = ($PATH /p/bin)
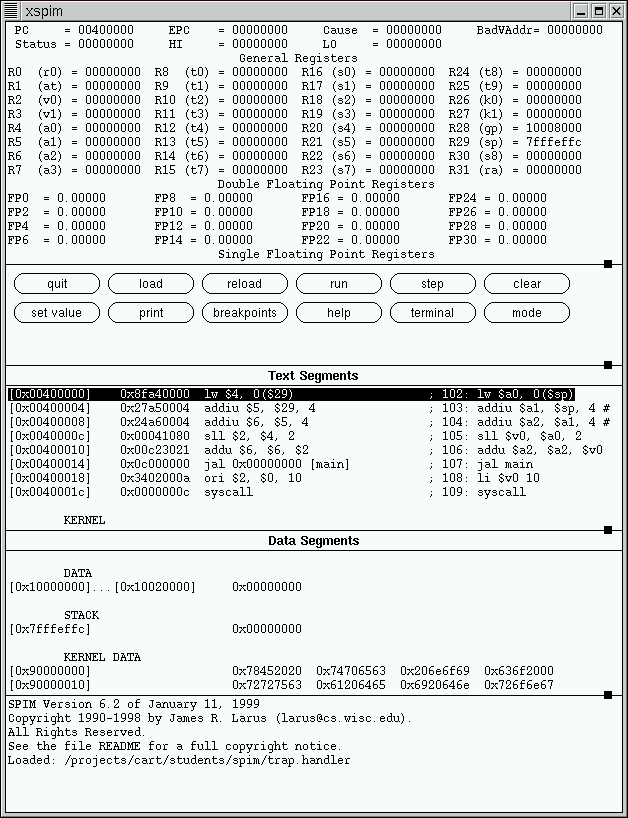
SPIM starts up and you should see the following
screen:
for more info on XSPIM see the spim manual
Let us see what the different sections in the xspim display represent,
The first number on the line, in the square brackets, is the hexadecimal memory address of the instruction. The second number is the instruction's numerical encoding, again displayed as a hexadecimal number. The third item is the instruction's mnemonic description. Everything following the semicoln is the actual line from our assembly file that produced the instruction. The number 102 is the line number in that file. Sometimes there is nothing on the line after the semicolon. This means that the instruction was produced by SPIM as part of translating a pseudo-instruction.
Here are some small programs that you can try out in spim:
To load a program into spim, click on the load button.
In the popup window type in the name of the file you want to load.
Click on assembly file to load the file into spim.
Check the bottom messages panel to check if any errors occured
during the load. Spim parses the assembly file and checks for error during
load, so this is a good time to see if our program has no syntax and typo
errors.
To run the program click on the run button.
You will get a prompt window with
A SPIM Console window is a different window
from the spim simulator window. This is where user interaction with the
program occurs.
For example if the program is written such that
it requires some input from the user like,
Enter a number :
This message is displayed in the spim console
window,
to input a number, enter a number in the window and press <return>
The spim console is also the place where
output messages are displayed, so if we use a syscall that prints out a
message or some data it will appear in the spim console window.
Before you reload the same program or load another program it is
a good practise to clear the memory and registers.
Then click on reload | assembly file to reload the
program you had previously loaded. This is useful when you have made some
changes to your program and want to re-run it.
To clear memory and registers click on clear | memory & registers
Last Modified: 18/01/2006
by Madhavi Krishnan, (madhavi@cs.utexas.edu)