Project 3: Animator
Assigned: Thursday, October 18, 2018Due: Thursday, November 8, 2018 (by 11:59pm)
Artifact Due: Thursday, November 13, 2018 (by 11:59pm)
Project 3: AnimatorAssigned: Thursday, October 18, 2018Due: Thursday, November 8, 2018 (by 11:59pm) Artifact Due: Thursday, November 13, 2018 (by 11:59pm)
|
- Cubic Bézier (splined together with C0 continuity)
- Cubic periodic uniform B-spline (with C2 continuity)
You should implement the cubic version of these curves i.e. the curve parameter is raised to the third power in the curve representation.
mutable
std::vector
mutable std::vector
Control points define a curve; they are the ones that you can see and manipulate in the graph interface. The evaluated points are a sampled representation of the curve itself (i.e. the solid line that runs through or near the control points). At any given time t, the value of the curve is defined as the interpolated value between the two closest evaluated points (i.e. the two evaluated points on either side of t).
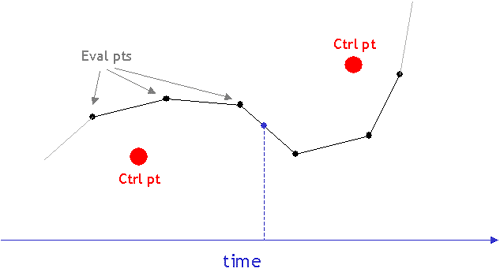
Since the user only specifies control points in the graph widget, the program must determine the actual shape of the curve. In other words, given a set of control points, the system figures out what the evaluated points are. This conversion process is handled by the CurveEvaluator member variable of each curve.
const CurveEvaluator* m_pceEvaluator;
In the skeleton, we've only implemented the LinearEvaluator. You should use this as a model to implement the other types of curve evaluators required: Bézier and B-Spline. The following section describes in greater detail what you need to do to add a curve.
For each curve type, you must write a new class derived from CurveEvaluator. Inside the class, you should implement the evaluateCurve function. This function takes the following parameters: ptvCtrlPts--a collection of control points that you specify in the curve editor, ptvEvaluatedCurvePts--a collection of evaluated curve points that you return from the function calculated using the curve type's formulas, fAniLength (the maximum time that a curve is defined), and bWrap - a flag indicating whether or not the curve should be wrapped. To add a new curve type, you should look in the GraphWidget constructor and change the following lines to use your new set of evaluator classes.
m_ppceCurveEvaluators[CURVE_TYPE_BSPLINE] = new
LinearCurveEvaluator();
m_ppceCurveEvaluators[CURVE_TYPE_BEZIER] = new
LinearCurveEvaluator();
For Bézier curves and B-splines, it is sufficient to sample the curve at fixed intervals of time. Adaptive algorithms such as the de Casteljau subdivision algorithm may be implemented for an extra credit.
You do not have to sort the control points or the evaluated curve points. This has been done for you. Note, however, that if you implement a bell/whistle that requires an interpolating curve (e.g. Catmull-Rom), the fact that the control points are given to you sorted by x does not ensure that the curve itself will also monotonically increase in x. You should recognize and handle this case appropriately. One solution is to return only the evaluated points that are increasing monotonically in x.
Here are the specific requirements for the particle system:
Once you've completed these tasks, you should be able to run your particle system simulation by playing your animation with the "Simulate" button turned on. As you simulate, the position of the particles at each time step are baked so that you can replay your animation without re-simulating. When you disable simulation, normal animation continues. The gray region in the white indicator window above the time slider indicates the time for which the simulation has been "baked."
The skeleton provides a very basic outline of a simulation engine, encapsulated by the ParticleSystem class. Currently, the header file (ParticleSystem.h) specifies an interface that must be supported in order for your particle system to interact correctly with the animator UI. Alternately, you can try to figure out how the UI works yourself by searching within the project files for all calls to the particle system's functions, and then re-organizing the code. This second option may provide you with more flexibility in doing some very ambitious particle systems with extra UI support. However, the framework seems general enough to support a wide range of particle systems. There is detailed documentation in the header file itself that indicates what each function you are required to write should do. Note that the ParticleSystem declaration is by no means complete. As mentioned above, you will have to figure out how you want to store and organize particles and forces, and as a result, you will need to add member variables and functions.
One of the functions you are required to implement is called computeForcesAndUpdateParticles:
virtual void computeForcesAndUpdateParticles(float t);
This function represents the meat of the simulation solver. Here you will compute the forces acting on each particle and update their positions and velocities based on these forces using Euler's method. As mentioned above, you are responsible for modeling particles and forces in some way that allows you to perform this update step at each frame.
Since particle simulation is often an expensive and slow process, many systems allow you to cache the results of a simulation. This is called "baking." After simulating once, the cached simulation can then be played back without having to recompute the particle positions at each time step. You are required to add this functionality to the ParticleSystem class. Included in the header file are a number of baking-related functions that you are required to implement. For your convenience, we've also left what we feel are relevant baking variables in the class:
/** Baking properties **/
float bake_fps; // frame rate at which simulation was baked
float bake_start_time; // time at which baking started
float bake_end_time; // time at which baking ended
bool baked; // flag for baked particles
The one significant baking variable that is NOT included in this list is a data structure that stores a collection of particle configurations that can be indexed by time. When simulation mode is enabled, you should call bakeParticles at each time step from within computeForcesAndParticles to save the positions of all particles into this data structure. Then, when we play back, we can simply look up into this data structure with the current time to see if a configuration has been saved. If so, you should just draw the particles according to this configuration without re-simulating them. For example, this is a possible structuring of the code:
virtual void computeForcesAndUpdateParticles(float t)
{
...
if (simulate) {
...
bakeParticles(t);
...
}
...
}
virtual void bakeParticles(float t)
{
// save particles in data structure
}
virtual void drawParticles(float t)
{
// if we need to draw particles, check
// if there's an entry in your baked data structure
// for time t. if there is, use the saved
// configuration to draw.
}
In the sample robotarm.cpp file, there is a comment in the main function that indicates where you should create your particle system and hook it up into the animator interface. After creating your ParticleSystem object, you should do the following:
ParticleSystem *ps = new ParticleSystem();
...
// do some more particle system setup
...
ModelerApplication::Instance()->SetParticleSystem(ps);
The interface for this project consists of two components: a slider control interface and an animation curve interface. The slider control interface allows you to control each degree of freedom of your hierachical model with a slider. The animation curve interface allows you to specify how each degree of freedom behaves as a function of time. In addition, you can manipulate the viewpoint by interacting directly with the view of the 3D model.
In the skeleton code distribution, we've included the fluid file for the ModelerUIWindows class (modeleruiwindows.fl). In addition, we've included the binary for fluid so that you can (if you want) make additions to the UI.
|
Command |
Action |
| LEFT MOUSE | Clicking anywhere in the graph creates a control point for the selected curve. Ctrl points can be moved by clicking on them and dragging. |
| CTRL LEFT MOUSE | Selects the curve |
| SHIFT LEFT MOUSE | Removes a control point |
| ALT LEFT MOUSE | Rubber-band selection of control points |
| RIGHT MOUSE | Zooms in X and Y dimensions |
| CTRL RIGHT MOUSE | Zooms into the rubber-banded space region |
| SHIFT RIGHT MOUSE | Pans the viewed region |
Note that each of the displayed curves has a different scale. Based on the maximum and minimum values for each parameter that you specified in your model file, the curve is drawn to "fit" into the graph. You'll also notice that the other curve types in the drop-down menu are not working. One part of your requirements (outlined below) is to implement these other curves.
At the bottom of the window is a simple set of VCR-style controls and a time slider that let you view your animation. "Loop" will make the animation start over when it reaches the end. The "Simulate" button relates to the particle system which is discussed below. You can use the Camera keyframing controls to define some simple camera animations. When you hit "Set", the current camera position and orientation (pose) is saved as a keyframe. By moving the time slider and specifying different pose keyframes, the camera will linearly interpolate between these poses to figure out where it should be at any given time. You can snap to a keyframe by clicking on the blue indicator lines, and if you hit "Remove", the selected keyframe will be deleted. "Remove All" removes all keyframes.
void RobotArm::draw()
{
...
// draw your model
...
...
endDraw();
}
Each group should turn in their own artifact. We may give extra credit to those that are exceptionally clever or aesthetically pleasing. Try to use the ideas discussed in the John Lasseter article in your CoursePak. These include anticipation, follow-through, squash and stretch, and secondary motion.
Finally, please try to limit your animation to 30 seconds or less. This may seem like a short amount of time, but it really isn't. Frequently, animations that are longer than this time seem to be running in slow motion. Actions should be quick and to the point.
![]() Render your particle system as something other
than white points!
Render your particle system as something other
than white points!
![]() Enhance the required spline options. Some of
these will require alterations to the user interface, which is
somewhat complicated to understand. If you want to access mouse events
in the graph window, look at the handle function in the
GraphWidget class. Also, look at the Curve class to see
what control point manipulation functions are already provided. These
could be helpful, and will likely give you a better understanding of
how to modify or extend your program's behavior. A maximum of 3
whistles will be given out in this category.
Enhance the required spline options. Some of
these will require alterations to the user interface, which is
somewhat complicated to understand. If you want to access mouse events
in the graph window, look at the handle function in the
GraphWidget class. Also, look at the Curve class to see
what control point manipulation functions are already provided. These
could be helpful, and will likely give you a better understanding of
how to modify or extend your program's behavior. A maximum of 3
whistles will be given out in this category.
![]() If you find something you don't like about the interface, or something
you think you could do better, change it! Credit varies with the quality
of the improvement.
If you find something you don't like about the interface, or something
you think you could do better, change it! Credit varies with the quality
of the improvement.
![]() Implement wrapping for all the required curve types.
The linear curve code provided in the skeleton already
supports wrapping, which
means that the curve has C0 continuity between the end of
the animation and the beginning. As a result, looping the animation
does not result in abrupt jumps. To get credit for wrapping, you must
implement it for each curve type; for information on
Bézier curve wrapping, look here.
Implement wrapping for all the required curve types.
The linear curve code provided in the skeleton already
supports wrapping, which
means that the curve has C0 continuity between the end of
the animation and the beginning. As a result, looping the animation
does not result in abrupt jumps. To get credit for wrapping, you must
implement it for each curve type; for information on
Bézier curve wrapping, look here.
![]() Implement adaptive Bézier curve generation; i.e., use a recursive,
divide-and-conquer, de Casteljau algorithm to produce Bézier curves
rather than just sampling them at some arbitrary
interval. You are required to provide some way to change these variables,
with a keystroke or mouse click. In addition, you should have some
way of showing (a printf statement is fine) the number of points
generated for a curve to demonstrate your adaptive algorithm at
work. If you provide visual controls to toggle the feature, modify
the flatness parameter (with a slider for e.g.) and show the number of
points generated for each curve, you will get an extra whistle.
Implement adaptive Bézier curve generation; i.e., use a recursive,
divide-and-conquer, de Casteljau algorithm to produce Bézier curves
rather than just sampling them at some arbitrary
interval. You are required to provide some way to change these variables,
with a keystroke or mouse click. In addition, you should have some
way of showing (a printf statement is fine) the number of points
generated for a curve to demonstrate your adaptive algorithm at
work. If you provide visual controls to toggle the feature, modify
the flatness parameter (with a slider for e.g.) and show the number of
points generated for each curve, you will get an extra whistle.
![]() Extend the particle system to handle springs. For example, a
pony tail can be simulated with a simple spring system where one spring
endpoint is attached to the character's head, while the others are
floating in space. In the case of springs, the force acting on the
particle is calculated at every step, and it depends on the distance
between the two endpoints. For an extra bell, implement
spring-based cloth.
Extend the particle system to handle springs. For example, a
pony tail can be simulated with a simple spring system where one spring
endpoint is attached to the character's head, while the others are
floating in space. In the case of springs, the force acting on the
particle is calculated at every step, and it depends on the distance
between the two endpoints. For an extra bell, implement
spring-based cloth.
![]() Euler's method is a very simple technique for solving the
system of differential equations that defines particle motion.
However, more powerful methods can be used to get better, more accurate
results. Implement your simulation engine using the Runge-Kutta
technique.
Euler's method is a very simple technique for solving the
system of differential equations that defines particle motion.
However, more powerful methods can be used to get better, more accurate
results. Implement your simulation engine using the Runge-Kutta
technique.
![]() Allow for particles to bounce off each other by detecting
collisions when updating their positions and velocities. Although it
is difficult to make this very robust, your system should behave
reasonably.
Allow for particles to bounce off each other by detecting
collisions when updating their positions and velocities. Although it
is difficult to make this very robust, your system should behave
reasonably.
that computes the intermediate angles necessary such that all constrains are
met, or met as closely as possible. This general approach is known as
inverse kinematics (IK). Some notes on IK are available
here.
If you developed your program
on a non-lab machine, you will need to transfer your work to the Linux machines
before submitting it (any ftp program should work).
1) To turn in the main project, first clean your development
area so that all *.o and binary executables are removed.
2) To turn in your artifact, you will need to submit:
To generate the movie first save all the frames of your animation
to disk using the Save Movie As option from the File menu.
The Unix command
"convert [base_filename]*.bmp artifact.mpg"
may be useful in creating your movie, although you may
use any movie making tool you wish.
The single frame should be taken from one of your frames in the movie.
It will be used as the link to your movie in the gallery.
If you wish to share additional information
about the artifact (e.g. interesting techniques [or hacks] you used,
artistic notes, etc.), you are welcome to include a readme.txt in
your artifact submission.
![]() Implement a "general" subdivision curve, so the user can specify an
arbitrary averaging mask You will receive still more credit if you can
generate, display, and apply the evaluation masks as well. There's a
Implement a "general" subdivision curve, so the user can specify an
arbitrary averaging mask You will receive still more credit if you can
generate, display, and apply the evaluation masks as well. There's a
![]()
![]() Implement a C2-Interpolating curve. There is already an
entry for it in the drop-down menu. See write-up from the Bartels,
Beatty, and Barsky book (in the course reader).
Implement a C2-Interpolating curve. There is already an
entry for it in the drop-down menu. See write-up from the Bartels,
Beatty, and Barsky book (in the course reader).
![]()
![]() Use some sort of procedural modeling (such as an L-system) to generate
all or part of your character. Have parameters of the procedural
modeler controllable by the user via control widgets.
Use some sort of procedural modeling (such as an L-system) to generate
all or part of your character. Have parameters of the procedural
modeler controllable by the user via control widgets.
![]()
![]() [Note: This requires the earlier Catmull-Rom whistle]
[Note: This requires the earlier Catmull-Rom whistle]
Add the
ability to edit Catmull-Rom curves using the two "inner" Bézier
control points as "handles" on the interpolated "outer" Catmull-Rom
control points. After the user tugs on handles, the curve will, in
general, no longer be Catmull-Rom. In other words, the user starts by
drawing a C1 continuous curve with the Catmull-Rom choice
for the inner Bézier points, but can then be modified by selecting and
editing the handles. The user should be allowed to drag the
interpolated point in a manner that causes the inner Bézier points to
be dragged along. See PowerPoint and Illustrator pencil-drawn curves
for an example. Credit will vary depending on how much freedom the
user is given to edit the inner control points; e.g., Powerpoint
allows you to constrain the inner control points to make the curve
C1("Smooth"), G1
("Straight"), or
C0/G0("Corner") around the
interpolated point. More credit is available if you can make the curve
C-1, which would allow you, for example, to do
camera jump-cuts easily.
![]()
![]() Implement picking of a part in the model hierarchy. In other words,
make it so that you can click on a part of your model to select its
animation curve. To recognize which body part you're picking,
you need to first render all body parts into a hidden buffer using
only an emissive color that corresponds to an object ID. After
modifying the mouse-ing UI to know about your new picking mode, you'll
figure out which body part the user has picked by reading out the ID
from your object ID buffer at the location where the mouse
clicked. This should then trigger the GraphWidget to select the
appropriate curve for editing. If you're thinking of doing either of
the six-bell inverse kinematics (IK) extensions below, this kind of
interface would be required.
Implement picking of a part in the model hierarchy. In other words,
make it so that you can click on a part of your model to select its
animation curve. To recognize which body part you're picking,
you need to first render all body parts into a hidden buffer using
only an emissive color that corresponds to an object ID. After
modifying the mouse-ing UI to know about your new picking mode, you'll
figure out which body part the user has picked by reading out the ID
from your object ID buffer at the location where the mouse
clicked. This should then trigger the GraphWidget to select the
appropriate curve for editing. If you're thinking of doing either of
the six-bell inverse kinematics (IK) extensions below, this kind of
interface would be required.
![]()
![]() If you implemented a "twist" degree of freedom for some part of your
model, applying the rotational degrees of freedom can give some
unexpected results. For example, twist your the degree of freedom by
90 degrees. Now try to do rotations as normal. This effect is called
gimbal lock. Implement Quaternions as a method for avoiding the
gimbal lock.
If you implemented a "twist" degree of freedom for some part of your
model, applying the rotational degrees of freedom can give some
unexpected results. For example, twist your the degree of freedom by
90 degrees. Now try to do rotations as normal. This effect is called
gimbal lock. Implement Quaternions as a method for avoiding the
gimbal lock.
![]()
![]()
![]() An alternative way to do animations is to transform an already
existing animation by way of
motion warping (see example
animations).
Extend the animator to support this type of motion editing.
An alternative way to do animations is to transform an already
existing animation by way of
motion warping (see example
animations).
Extend the animator to support this type of motion editing.
![]()
![]()
![]()
![]() Incorporate rigid-body simulation functionality into your program, so
that you can correctly simulate collisions and response between rigid
objects in your scene. You should be able to specify a set of objects
in your model to be included in the simulation, and the user should
have the ability to enable and disable the simulation either using the
existing "Simulate" button, or with a new button.
Incorporate rigid-body simulation functionality into your program, so
that you can correctly simulate collisions and response between rigid
objects in your scene. You should be able to specify a set of objects
in your model to be included in the simulation, and the user should
have the ability to enable and disable the simulation either using the
existing "Simulate" button, or with a new button.
![]()
![]()
![]()
![]() Extend your system to support subdivision surfaces. Provide a simple
interface for the user to edit a surface. The user should also be able
to specify surface features that stay constant so that sharp creases
can be formed. Tie your surface to the animation curves to demonstrate
a dynamic scene. Look
here
for a collection of links. As mentioned above in the blurb for the
subdivision curve bell, Caltech has a few nice applets
here.
Extend your system to support subdivision surfaces. Provide a simple
interface for the user to edit a surface. The user should also be able
to specify surface features that stay constant so that sharp creases
can be formed. Tie your surface to the animation curves to demonstrate
a dynamic scene. Look
here
for a collection of links. As mentioned above in the blurb for the
subdivision curve bell, Caltech has a few nice applets
here.
![]()
![]()
![]()
![]()
![]()
![]() You might notice after trying to come up with a good animation that
it's difficult to have very "goal-oriented" motion. Given a model of a
human, for instance, if the goal is to move the hand to a certain
coordinate, we might have to animate the shoulder angle, elbow angle
-- maybe even the angle of the knees if the feet are constrained to
one position. Implement a method, given a set of position constraints
like:
You might notice after trying to come up with a good animation that
it's difficult to have very "goal-oriented" motion. Given a model of a
human, for instance, if the goal is to move the hand to a certain
coordinate, we might have to animate the shoulder angle, elbow angle
-- maybe even the angle of the knees if the feet are constrained to
one position. Implement a method, given a set of position constraints
like:
left foot is at (1,0,2)
right foot is at (3,0,4)
left hand is at (7,8,2)
Project Turn-in
Last modified: 08/28/18
by Don Fussell
fussell@cs.utexas.edu