All Python scripts originate in init.py. This script is responsible for requesting low-level computations from C++ modules, as requesting processing from python behaviors. After performing initial computations, the current behavior's processFrame method is called.
The default behavior used in the CS393R class is in classBvr.py. This script simply checks the game state and calls the corresponding task for that state. Game state tasks can be defined in gameStates.py.
State machines are a basic construct provided by the codebase that you may find useful to take advantage of. They come in two flavors: SimpleStateMachine and StateMachine. The simple version takes a list of state names as its constructor argument and creates a structure with those state names as member variables. The main purpose of the SimpleStateMachine is to help track which state you're in and how long you've been in that state. When more advanced transition graphs are needed, the StateMachine class is appropriate.
The state machine comes with a set of basic events and a Node definition from state.py. Transitions can be defined in a state machine's setup method using the self._adt, where "adt" stands for "add transition".
The basic event types are as follows:
Each frame the state machine will check all events originating from the current node. When an event fires the state machine will transition to the event's successive node. Thus, a statement like self._adt(start, T(3.0), StandNode()) will tell the state machine to transition from the start node to a standing node after remaining in start for 3 seconds. Naming nodes is necessary when a particular node needs to be referenced multiple times. In some cases a node is referenced only once, so these can be chained together in the _adt method: self._adt(start, T(3.0), StandNode(), T(3.0), finish). The method will take any number of arguments, and expects them in the order "Node, Event, Node, Event, Node, ..." corresponding to their organization in the event chain.
When the robot is set to Playing, a simple finite state machine will execute as defined in testFSM.py. This machine will randomly walk forward, turn left, or turn right until it has chosen 4 actions. At this point the robot will say, "Completed," and sit down.
At some point it will be necessary to access sensor values in your behavior scripts. These can be accessed directly through the percepts module:
import percepts
print "My head yaw value is %f!" % percepts.joint_angles[core.HeadYaw]
Additionally, high level commands such as walking and standing can be called from the behavior scripts. These are available in commands.py.
The vision module processes both cameras in sequence, starting with the top. Objects that are found by the top camera may be overwritten by the bottom. When an object is successfully found, the vision module is responsible for filling out information in the appropriate WorldObject instance. For example, we might place the following in the core/vision/BallDetector.cpp file:
void BallDetector::detectBall() {
	int imageX, imageY;
	if(!findBall(imageX, imageY)) return; // function defined elsewhere that fills in imageX, imageY by reference
	WorldObject* ball = &vblocks_.world_object->objects_[WO_BALL];

	ball->imageCenterX = imageX;
	ball->imageCenterY = imageY;

	Position p = cmatrix_.getWorldPosition(imageX, imageY);
	ball->visionBearing = cmatrix_.bearing(p);
	ball->visionElevation = cmatrix_.elevation(p);
	ball->visionDistance = cmatrix_.groundDistance(p);

	ball->seen = true;
}
A behavior script may then check the seen variable for the ball object as follows:
import core

ball = core.world_objects.getObjPtr(core.WO_BALL)
if ball.seen:
walkTowardBall()
To decide when an object has been seen, the vision module relies on a number of detectors. Each detector has access to the blob_detector_ and classifier_ objects. The classifier is responsible for converting the YUV image pixels into a small set of colors corresponding to different field objects and organize these into contiguous runs of color. These colors are defined in core/vision/enums/Colors.h. The blob detector is responsible for combining adjacent runs into blobs. Most of the code for these has been removed for the uses of the class, but the classifier will still classify pixels according to our standard color set. To access these colors, use the getSegPixelValueAt(x,y) macro available to each detector in the vision module. A simple orange ball detector could then look like this:
bool BallDetector::findBall(int& imageX, int& imageY) {
	imageX = imageY = 0; int total = 0;
	for(int x = 0; x < iparams_.width; x++)
		for(int y = 0; y < iparams_.height; y++)
			if(getSegPixelValueAt(x,y) == c_ORANGE)
				imageX += x, imageY += y, total++;
	if(!total) return false;
	imageX /= total, imageY /= total;
	return true;
}
The detectors in the vision module are all handled by the ImageProcessor class. The main purpose of this class is to hold pointers to these objects, use them in the correct order, and perform some basic decisions about when (not) to use a detector. All of this happens in the ImageProcessor::processFrame method. So if we wanted to actually use the BallDetector class's detectBall method, we'd add it to the ImageProcessor as follows:
void ImageProcessor::processFrame(){
	updateTransform();

	classifier_->classifyImage(color_table_);
	ball_detector_->detectBall(); // detect the ball from the segmented image
}
/* Call these once at the start of each frame*/
classifier_->classifyImage(color_table_);
classifier_->constructRuns();

/* ... */

blob_detector_->formBlobs(c_ORANGE);
BlobCollection blobs = blob_detector_->horizontalBlob[c_ORANGE];
if(blobs.size() > 0) {
  printf("found %i blobs\n", blobs.size());
  for(int i = 0; i < blobs.size(); i++) {
    Blob& b = blobs[i];
    printf("blob %i is centered at %i, %i, in bounding box (%i,%i) to (%i,%i)\n",
      i, b.avgX, b.avgY, b.xi, b.yi, b.xf, b.yf
    );
  }
}
While simple objects like the ball can be detected as single blobs, more complex objects like lines will need additional processing.
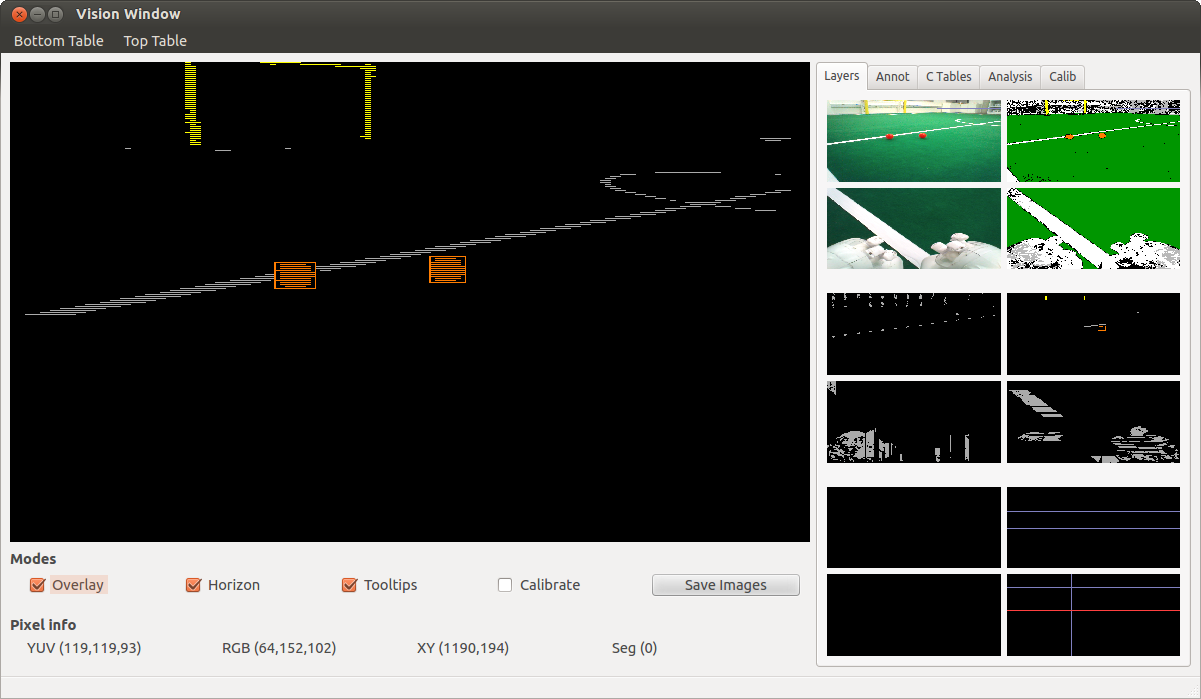
If you're viewing a log with "Run Core" enabled, you can see the detected orange blobs using the tool by looking at the middle right images of the Vision window. In the window below, the orange balls have been identified as blobs and thus have had their bounding boxes drawn around them. Other runs of contiguous color exist in the image, but these haven't been merged into blobs so they're represented as straight lines. Hovering the mouse over a blob gives more detailed information about it. To enable this feature for other colors, you'll need to edit the tools/UTNaoTool/VisionWindow_Draw.cpp file in the drawHorzLinePoints or drawVertLinePoints methods.
Kicking makes the robots unstable, especially on some more than others. Always be behind your robot, ready to catch it, when it is kicking.