| Project Home |
Project Illuminate: Step 3
Controlling the Lights: Software
Now that the hardware is set up, let's take a look at the software. Software is the programs that tell the hardware what to do. We've already seen an example of a piece of software that controls the Arduino board: the Blink program. Now let's begin looking at software to control the lights through the Arduino board.
Task 3.0: Skeleton Code
To begin, you'll first need to download the Project Illuminate framework. Right click on the link below and then save the file into your home directory. (Note that if you don't specify the directory, it will save to your Downloads directory, and you'll want to move it from there to your home directory.)
Then, using the terminal from which you opened the Arduino IDE, type the
following commands, which will unzip and expand the archive you just downloaded:
gunzip illuminate_framework.tar.gz
tar -xvf illuminate_framework.tar
Next, we need to open the Project Illuminate framework. From within the Arduino IDE, select File->Open. From there, navigate to your home directory and click on the illuminate folder. Within that directory, you'll find a project_framework folder. Double click on that and then again on project_framework.ino.
The Arduino sketchbook called project_framework should be opened.
This framework already consists of a few files (indicated by the tabs across the top), and you may add your own as you progress in the project. The pre-existing files are briefly described here, and we'll look at some of them more in-depth below.
- project_framework: this file contains the setup() and loop() functions that we also saw in the Blink example. The setup() function is complete as provided (for now, you may want to change it later), but you'll be modifying the loop() function.
- lights.cpp/lights.h: these files are a header file (lights.h) and source file (lights.cpp). These files contain the data structures that provide access to the lights and functions that will enable some basic capabilities. You'll want to use the functions, but you should not need to change any of the code in these files.
- tests.cpp/tests.h: these are the files where you will begin programming. They contain the stub code for many functions that will help you learn to control the lights yourself.
- project.cpp/project.h: these are the files where you will put your code for your project, once you finish the lights tutorial.
Task 3.1: Blink Light 0
Before you can use the lights we'll need to do one more thing: add a library to your Arduino setup. A library is a collection of already-written functions available for you to use. The framework for this project depends on functions and data structures defined in the FastLED library. To use this library, you first need to add it to your Arduino environment.
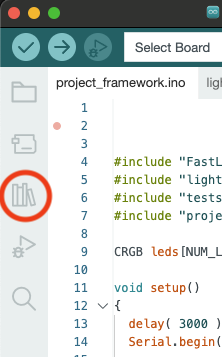
To add the FastLED library, you'll want to open the Library Manager
by clicking on the books on the left-hand panel of the Arduino IDE.
A panel will open with a search box at the top:
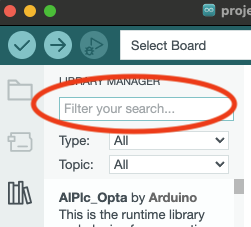
Type "FastLED" into that search box, and then click INSTALL on the first option.
Now, let's look at the tests.cpp file. At the top of this file, there is a function called blink_light_0_example, which is provided for you.
You'll notice that this code is making changes to a data structure called leds: the framework is set up so that you make changes to the lights in the leds data structure but those changes are not reflected in the actual lights immediately. Instead, when you are ready for your changes to be reflected in the lights, you call the function FastLED.show(), which calls the show() function in the FastLED library, and will mirror your changes into the actual lights.
You'll also notice, though, that there is no call to FastLED.show() in blink_light_0_example(), but there is a call to FastLED.delay(). Here's why:
While FastLED.show() updates the lights
with your changes, we often want the changes we've made to appear for some
amount of time before the lights change again. To help us do that, the FastLED
library provides a function called delay, which you call in the exact
same manner as show(), with one addition: the delay function
takes one argument. That argument tells the program how long it should wait
in milliseconds before proceeding to the next instruction. For
example, if you would like to delay for one second, use the command:
FastLED.delay(1000)
delay() also calls show(), so you don't have to call one and then the other each time you want to update your lights. (Why might you want to show() without providing a delay?)
Now take a careful look at blink_light_0_example() and convince yourself that you understand its contents. You'll also notice that this function is called from the loop() function inside the project_framework file. When you are ready, test the example by uploading it to the Arduino board (use the arrow pointing to the right as you did to blink the LED). The lights will first perform some tests where they alternate PaleVioletRed and SteelBlue, and then the code in the loop() function will begin to execute. In this case, that code is our blink_light_0_example().
If the code works properly, you should notice light 0 blinking white. (Notice that this is light 0 and not light 1!)
Now, change the code to do the following things:
- Blink a color other than white. There are two ways to change the color:
-
Each light is represented by a struct called CRGB. This struct
contains fields red, green, and blue. The color and
brightness of each light is controlled by setting the values of those fields.
The potential values for each field range from 0-255, where 0 represents no
color and 255 represents maximum color. Using variations of these numbers, you
can create many colors with a range of brightnesses. For instance,
a red value of 255 and green and blue values of 0
result in the brightest red possible, where a red value of 64 and green
and blue values of 0 is red at about 1/3 of maximum brightness. White is
represented as 255, 255, 255, and black, which is the same as off, is
represented as 0, 0, 0. You can use this method to set the color of a light
using code similar to the code below, which changes the color of light 0:
   leds[0].red=112;
   leds[0].green=75;
   leds[0].blue=23;
- The FastLED library also provides many predefined colors for
you. We have
created a sorted list for you.
The colors in the file can be accessed by prepending CRGB::
to the name, such as CRGB::Aquamarine. To set a color of a light using
this method, you would use code similar to the code below, which changes the
color of light 0:
leds[0] = CRGB::Aquamarine
-
Each light is represented by a struct called CRGB. This struct
contains fields red, green, and blue. The color and
brightness of each light is controlled by setting the values of those fields.
The potential values for each field range from 0-255, where 0 represents no
color and 255 represents maximum color. Using variations of these numbers, you
can create many colors with a range of brightnesses. For instance,
a red value of 255 and green and blue values of 0
result in the brightest red possible, where a red value of 64 and green
and blue values of 0 is red at about 1/3 of maximum brightness. White is
represented as 255, 255, 255, and black, which is the same as off, is
represented as 0, 0, 0. You can use this method to set the color of a light
using code similar to the code below, which changes the color of light 0:
- Blink at a different brightness level. Here's how you change the
brightness:
The brightness of the light set as a whole is controlled through the function FastLED.setBrightness(), which sets the brightness for the entire strand of lights. Brightness values range from 0 to 255. Beware, though, as the 255 value results in very bright lights and some colors appear faded.
To get some idea of how the colors appear at brightness level 64, execute the ColorPalette example in the FastLED library, which is found in project_framework/lib/examples/ColorPalette. You can launch it by either opening the .ino file in that directory through the Arduino IDE or by navigating to that directory using the Navigator (double click on the hard drive labeled File System on your desktop).
- Blink at either a faster or slower frequency. (Think about FastLED.delay() and what it does!)
Good job! You've learned how to control light 0. Next, we'll learn how to
control more than one of the lights. ;)
Before you move on, turn your cups to red so that a member of the camp staff can
check your code, and switch drivers.
Task 3.2: Blink the First and Last Lights
For our next test, let's blink both the first and last light. Recall that we have 25 lights. If the first light is number 0, what do you suppose the last light is?
Using the information you learned in Task 3.1, complete the blink_light_0_and_24() function in tests so that the first and last lights blink. Test your function by commenting out the call to blink_light_0_example in the loop() function in project_framework and uncommenting the call to blink_lights_0_and_24() in that same function. Please ask if you need help!
Woot, woot! Before moving on to controlling all the lights, turn your cups to
red so that a member of the camp staff can check your code, and switch
drivers.
Task 3.3: Blink All Lights
In your C++ tutorial, you learned how to use loops. Using a loop, complete the blink_all_lights() function so that every light blinks. Once again, test it by commenting out any calls to other functions in the loop() function in project_framework and uncommenting the call to blink_all_lights() in that same function.
Congratulations! You are able to control the lights! Now you are ready to
begin doing more complicated things.
First, turn your cups to red so that a
member of the camp staff can check your code, and switch drivers.
Next, move on to creating basic patterns!