 |
|---|
Assignment 2: Image Manipulation
|
Assignment 2: Image Manipulation
|
You will then use those features to implement the following filters:
Grayscale
Tint
Gaussian blur approximation (3x3)
Gaussing blur approximation (5x5)
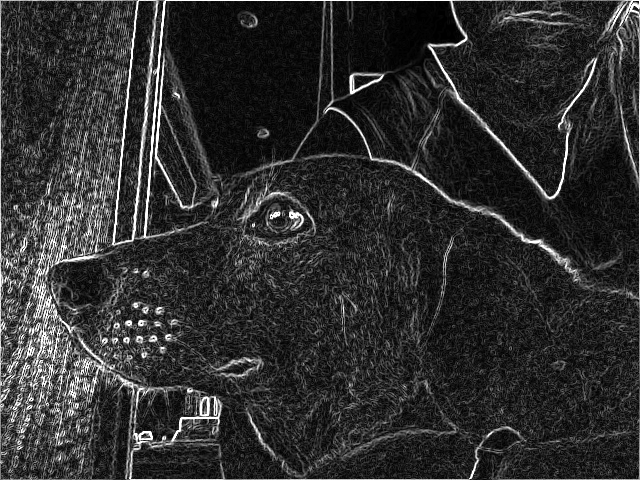
Edge detection
Image loading: Provide functionality for loading an image of your choice. Even though you only need to support this one image, this code should be flexible and load images of multiple sizes, as the MonoGame window itself should map to the size of any given image.
Keyboard input-handling: The user should be able to input key commands for 1-5 as well as 0. The functionality of each button is described below with the filter it applies. If you want to make additional filters, include additional key inputs and document all extra work within your assignment doc, so the graders know what to expect.
A kernel/convolution matrix: This convolution matrix will be applied to all pixels when filters requiring neighborhood information are called. Example code is included in the slides, but there are a couple more caveats:
Grayscale: This filter will convert a color image to a grayscale image when the user presses "1". One way to do this is by averaging across all color channels on a per-pixel basis then assigning that value across all three color channels. This roughly preserves the value even if hue and saturation are discarded.
Tint: This filter will apply the tint of your choice to the image when the user presses "2". You can calculate tint in a variety of ways, but your report should specify the equation you're using to apply tint and maybe a short explanation of why you implemented tint the way you did.
Gaussian blur approximation (3x3): This filter will approximate a 3x3 Gaussian Blur when the user presses "3". Since blurring requires neighborhood knowledge of pixels, it will rely on your kernel, or convolution matrix, to extract and manipulate the necessary pixel information. You will need to buffer the updated image in order to prevent your changes to the image from influencing its neightbors. Example of a 3x3 approximation below (from Wikipedia).

Gaussian blur approximation (5x5): This filter will approximate a 5x5 Gaussian Blur when the user presses "4". Since blurring requires neighborhood knowledge of pixels, it will rely on your kernel, or convolution matrix, to extract and manipulate the necessary pixel information. You will need to buffer the updated image in order to prevent your changes to the image from influencing its neightbors. Example of a 5x5 approximation below (from Wikipedia).

Note to receive full credit, this should use the same function as the other Gaussian blur approximation, so please make sure you code is flexible enough to hand kernels of different sizes.
Edge detection: This filter will perform edge detection using the Sobel operators when the user presses "5". This filter also requires neighborhood knowledge of pixels, and therefore will also use your kernel. Again, you will need to buffer the updated image to prevent any changes in pixels from influencing their neighbors.
Remember from the class that there are two Sobel operators: horizontal and vertical. To combine these operators, you will determine each pixel's updated value in both the vertical and horizontal directions. You can then take the magnitude (i.e. distance) and assign that value to the final pixel output. To take the magnitude take the square root of the added squared convolution values.
No Filter When the user presses "0" the displayed image should return to its original form. You should consider always displaying the same "working copy" Texture2D but write back to it from the "clean" copy when this key is pressed rather than displaying a different image.
You will submit the following in the folder youreid_assignment2:
Zip this folder and submit via Canvas.