Project Description
This assignment will familiarize you with persistent data using Core Data as well as navigating with multiple views. You and your team will create a small game, where users create adventurers, who can then level up by going on "quests."
Basic Requirements
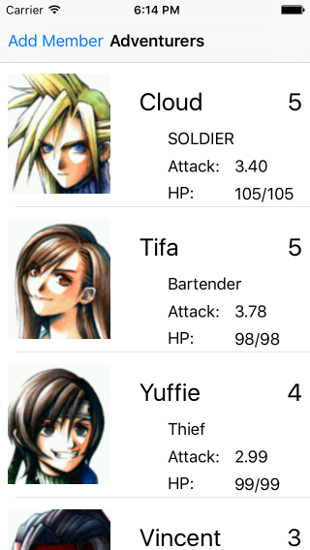
You will implement the following views in your project:- An "Adventurers" table view that displays all user-created adventurers.
- The adventurers' data are stored via Core Data.
- The adventurers will have attributes that at least include name, profession, level, current and total hit points, attack power multiplier, and a portrait.
- This list of adventurers and their stats should automatically update whenever the table view is displayed (but the order of adventurers does not have to be consistent).
- The adventurers will regain all their hitpoints whenever they return to this main screen.
- The user can delete an adventurer at any time and this will both remove that adventurer from the table as well as remove their data from persistent storage.
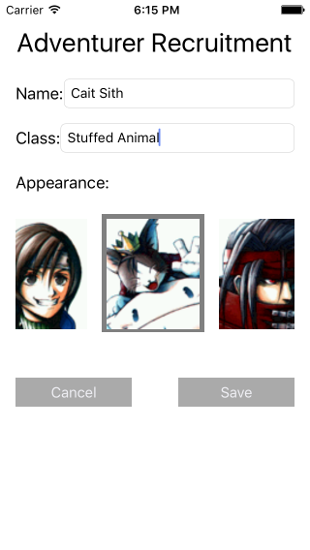
- An "Add Adventurer" view that allows the user to "recruit" new adventurers.
- Users can use text fields to set the adventurer's name and profession. They should not be able to set either to only whitespace (i.e. blank characters).
- Users can select the adventurer's appearance via a collection view. The collection view cell should in some way highlight, so the users can see their choice. This can be done using the UICollectionViewDelegate functions, didSelectItemAt and didDeselectItemAt
- The adventurer's level will default to 1 upon creation.
- The adventurer's hit points and attack power multiplier will be randomly assigned (preferrably within a range).
- When the user clicks "Save," the adventurer will be saved to persistent storage via Core Data
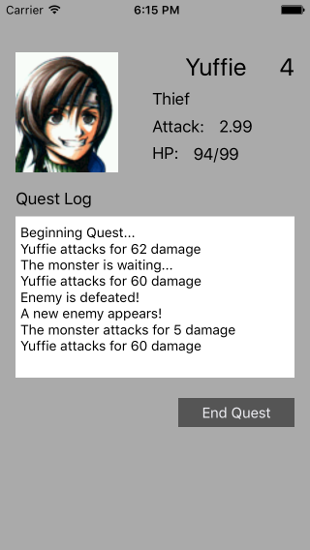
- A "Quest" view that starts a quest log when the user clicks on an adventurer.
- This view will display and update the adventurer's stats in real time
- A UITextView will act as the "quest log" where the user can see how their adventurer is faring against the enemies.
- A timer will determine when the adventurer can act, and at every timer event, the adventurer will attack based on the attack multiplier and a range of randomness. This will damage the "enemy" for a certain number of hit points. If the enemy dies, a new one will immediately spawn. If the adventurer defeats enough enemies, the adventurer will level up.
- Another timer will determine when the enemy can act, and at every timer event, the enemy will either attack for damage within a range (randomized), or wait. When the enemy attacks, the adventurer takes damage. If the adventurer's hit points go to zero or less, the adventurer's current hit points will be set to zero, and the quest will end (i.e. the timers will stop running).
- The quest log will output text for all events that happen during the timer, and while the exact wording of this text is up to you, it should include relevant details such as who attacked whom and for how much damage.
Getting Started
You will start by creating a new project, yourgroupid_assignment6, as a Single View iOS application that uses CoreData. You will need to implement the following features:- A CoreData Entity that models Adventurer data, including (at minimum) name, profession, level, portrait, total hitpoints, current hitpoints, and attack modifer.
- Three view controllers, "Adventurers," "Add Adventurer," and "Quest," created in Interface Builder.
- Code for the above view controllers created in the Xcode editor.
- To create and user timers, use the Timer class. You can declare/instantiate a timer calling timer = Timer() and you can start the time using timer = Timer.scheduledTimer(timeInterval: [time interval], target: self, selector: #selector([function to call]), userInfo: nil, repeats: true). This will call [function to call] at intervals of [time interval]. To stop a timer call timer.invalidate().
The "Add Adventurer" view will look something like this:
The "Quest" view will look something like this:
Extra Credit
To receive extra credit, you must first complete the required features. Include a README file explaining which extra features you included, so the grader can check for them.Additional adventurer attributes (1 point)
Include more attributes related to the adventurer such as defense, evasion and speed. These stats should in some way affect how the adventurer fares during their battles. Include at least two more attributes for credit.Full Enemy Type (4 points)
The base implementation of this project does not require that enemies be fully classed characters with their own stats (e.g. the enemies can be represented as an initial hitpoint value and a damage dealing range). Create a full Enemy class to allow for individual enemies with their unique attack modifiers, hit points, name, level etc, and potentially mulitple enemy attackers.Milestone: Alpha
Submit the "Alpha" of your Adventurer app. This will be a complete project folder, yourgroupid_assignment6. The alpha should include a demo of the UI interface that you'll eventually implement in your completed app. There should be enough navigation to allow the grader to navigate through all view screens (even if full functionality is not yet in place). This alpha should also demonstrate extensive progress has already been made into the underlying systems (either adventurer recruitment, or quest functionality) for full credit.What to turn in
For the final submission, you will turn in a zip of the project folder, yourgroupid_assignment6, that contains the file folder with code, assets, and yourgroupid_assignment6.xcodeproj via Canvas. Include a README file with extra credit details to receive extra credit.