Placed Online: Wednesday, October 24
Due: Thursday, November 8, no later than 11 pm
Points: 100, 10% of the final grade
Program Shell:
ImagesMain.java
Pair Assignment. You may work with one other person on this assignment using the pair programming technique. Review this paper on pair programming. You are not required to work in a pair on the assignment. (You may complete it by yourself if you wish.) If you begin working with one partner and do not wish to finish the assignment with that partner you must complete the assignment individually. If you work with a partner, the intent is that you work together, at the same computer. One person "drives" (does the typing and explains what they are doing) and the other person "navigates" (watches and asks questions when something is unclear). You should not partition the work, work on your own, and then put things together.
You and your partner may not acquire from any source (e.g. another student or an internet site) a partial or complete solution to a problem or project that has been assigned. You and your partner may not show other students your solution to an assignment. You may not have another person (current student other than your partner, former student, tutor, friend, anyone) “walk you through” how to solve an assignment. You may get help from the instructional staff and use code from class.
If you are working with a partner turn in one version of the assignment to one partner's turnin account. If you work with a partner, both student's in a pair will get the same grade on the assignment. You must include your partners information in the header at the top of the program.
The purpose of the assignment is to create and add 8 image transformation / filtering algorithms to the ImagesMain program.
Implement 7 required filters and 1 filter of you own choice / design. The point breakdown for the assignment is:
Red Only: 5 points
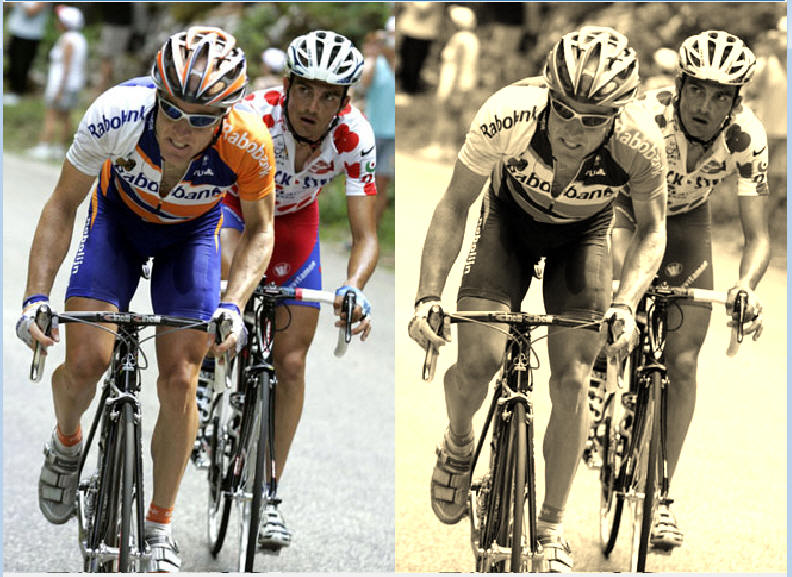
Sepia Tone: 5 points
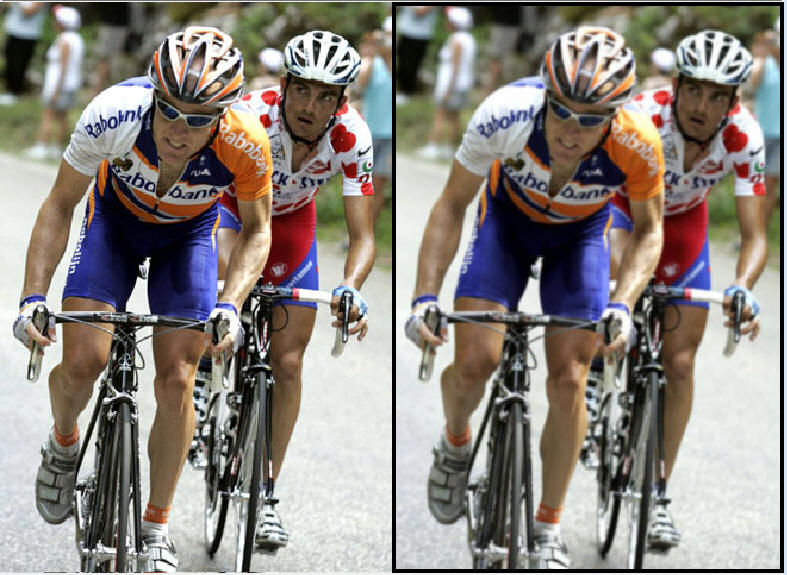
Gaussian blur: 10 points
Posterize: 10 points
Censor: 15 points
Color Pop: 15 Points
Edge Blur: 15 points
Your FilterOp: 10 points
code and program style: 15 points
Download the ImagesMain.java program. This includes the ImagesFrame class, the ImagesPanel.java, the FilterOps,java, and several classes that extend FilterOps. The program should compile and run as is. (The program uses some Java 1.6 features which such as FileNameExtensionFilters, so if you only have Java 1.5 loaded or have your compiler compliance level set to 1.5 in Eclipse you may get some syntax errors. You can comment out the FileNameExtensionFilters code if you need to.)
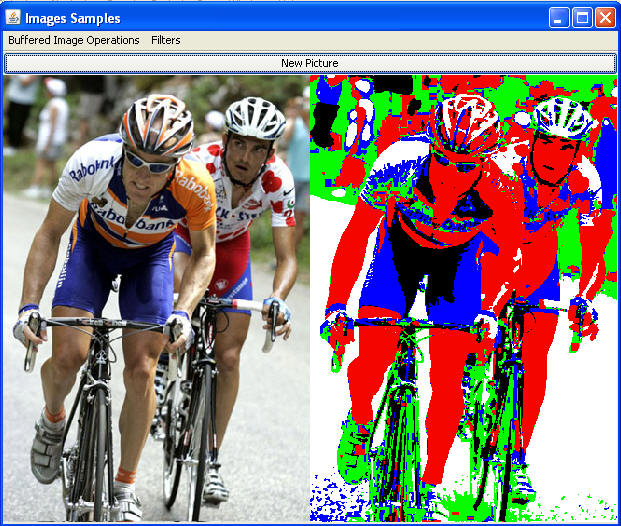
When run the program displays a GUI. By clicking on the New Picture button you can load a new image file.
Image filters are applied by selecting a menu item from one of the four drop down menus. The original image is displayed on the left or top and the filtered image is displayed on the right or bottom. Depending on the width and height of the image and the width and height of the panel.
You are to add a total of 8 filters to the program. I specify seven of the filters and your implement 1 filter of your own creation.
Make it clear which are the new filters by adding "Student Filter". So for example if you implement a Stained Glass Effect make the menu choice "Student Filter - Stained Glass Effect".
The filter of you own design will be a class that overrides FilterOp.
FilterOps is an abstract class that allows lower level pixel manipulation. This was demonstrated in lecture.
Create a class hat extend the FilterOps class in the ImagesMain.java file. When extending the class you must provide a version of this method:
public int filterOp(int pixel, int x, int y, BufferedImage
src){
The method returns an int which is intended to be the value for a pixel created via the makePixel method. The x and y coordinates and the source image are sent as parameters as well to allow neighborhood filters to be created.
You may also override the filter method. It depends on exactly what your own filter / transformation does.
There are various methods in the FilterOps class to make life a little easier. Colors are initially a single int. There are methods to pull out the rgb values from that single int that represents color.
After creating class that extend FilterOp you must add it to the GUI.
go to the createFilterOps method in the ImagesPanel class and call the put method on the filterOps variable (a tree set) with a string that is your name for the operation and a new FilterOps object.
Add the name of your op to the array of strings (FILTER_OPS) in the ImagePanel class so it shows up on the menu. You must use the exact same string for the array and the put method for the tree.
It is okay to implement a well known filter or transform for some of your filters (except for simple edge detection). This include things such as: dissolving an image (changing some number of pixels to the background color), half toning, etc. But, you should also try to be creative with some of the filters. Part of the grade will be based on how creative your filters are.
Trying using things like average values, median values, standard deviations, changing a pixel based on its difference from the origin, using some sort of image mask (another image).
Some things you might try:
partial dissolve
half toning
cyanotype
combination of effects other than the seven provided
adding noise to an image
combining two images (simple green screen / blue screen effect)
The required filters:
Gaussian blur: Implement a Convolve Op that performs a Gaussian Blur. The kernel is 7 by 7 in size with the following relative weights:
1 34 285 579 285 34 1

34 1174 9791 19856 9791 1174 34

285 9791 81674 165644 81674 9791 285

579 19856 165644 335946 165644 19856 579

285 9791 81674 165644 81674 9791 285

34 1174 9791 19856 9791 1174 34

1 34 285 579 285 34 1
If you use those actual values your will get a pure white image. So your actual values must be the relative weights shown divided by the total relative weights which equals 1,492,538. Thus the four corner cells with a weight of 1 must actually be set to 1 / 1492538 = 0.00000067
Posterize: Also called downsampling. The number of colors in each channel is reduced. Instead of 256 values for each channel there will be only 5. Use a lookup table to achieve this effect. The lookup table will have 256 elements. The values in the array are: indices 0 - 31: 0, indices 32 - 95: 64, indices 96 - 159: 128, indices 160 - 223: 192, indices 224 - 255: 255
Red Only: Each pixel retains its red value, but the green and blue values are set to 0. Implement this via a RescaleOp with factors (1, 0, 0) and offsets of (0, 0, 0).
Sepia Tone: Implement this via a FilterOp. Implement the filterOp method. The x and y parameter are unused. The provided filter method from FilterOp will work as is. Create a Sepia Tone image by applying these changes to each pixel:
outputRed = (inputRed * .393) + (inputGreen *.769) + (inputBlue * .189)

outputGreen = (inputRed * .349) + (inputGreen *.686) + (inputBlue * .168)

outputBlue = (inputRed * .272) + (inputGreen *.534) + (inputBlue * .131)
inputRed indicates the original red value of the pixel. Likewise for inputGreen and inputBlue.
Formulas taken from http://www.techrepublic.com/blog/howdoi/how-do-i-convert-images-to-grayscale-and-sepia-tone-using-c/120.
Censor: In this one the resolution of the image is greatly reduce. Implement this as a FilterOp. It is required to change the filter method from FilterOp. You must implement the filterOp method, but you may or may not use it depending on your approach.
The size of each new "pixel" is equal to the width of the image divided by 20 using integer division. This may result in the in trimming the image. The resulting image may be smaller in width and height. For example assume we have an image that is 208 pixels wide by 445 pixels high. The size of each "super pixel" is 10 by 10 (208 / 20 = 10). The image will be 10 "super pixels" wide and 44 "super pixels" high. (Image height = 445. 445 / 10 = 44). The resulting image must be set to a size of 200 by 440. The super pixels are actually regions of pixels all set to the same color. In this example each super pixel is 10 by 10 pixels. Each pixel in a "super pixel" must be set to the same color. The color of a super pixel is the obtained by getting the average red, green, and blue values of the corresponding pixels in the original image. It should be easy to change the number of super pixels wide the filter uses by changing one number in your code.
Color Pop: Usually color pop (keeping some pixels color and making all other gray scale) is performed by selecting or drawing a region. We will perform a color pop mathematically based on math only. The GUI includes a mouse listener. When a color is selected it is save to the ColorPop object. (I have done a partial implementation of the ColorPop class that extends FilerOp.)
If ColorPop is the current menu choice then all pixels whose color are within a certain "distance" to the color last selected with the mouse remain the same as the original image. All pixels whose color is greater than or equal to the "distance" are changed to grayscale pixels. (You won't be able to use the Grayscale filter op directly but can copy the necessary code.) The distance is current set to 65 when the GUI is created.
The distance between two colors is simply the distance between them in 3d space. In other words give color1 with rgb values (r1, g1, b1) and color2 with rgb values(r2, g2, b2) the distance between color1 and color2 is sqrt( (r1 - r2)2 + (g1 - g2)2 +(b1 - b2)2 )
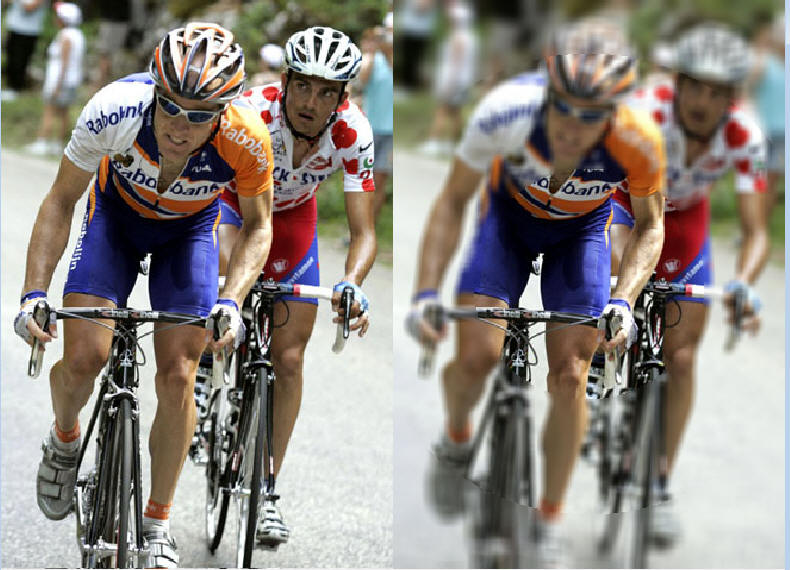
Edge Blur: Implement this as a FilterOp. There are 3 regions in the result image. A pixels value in the resulting image depends on its physical distance (as opposed to color distance) from the center of the image. The max distance is the distance from the center pixel to a pixel on a corner. For simplicities sake assume the center is cx = src.getWidth() / 2 and cy = src.getHeight() / 2. The max distance is thus sqrt( (0 - cx)2 + (0 - cy)2).
All pixels that are within one third of the max distance of the center are the same in the resulting image as in the source. All pixels that are between one third and two thirds of the max distance from the center are set to the average of the pixels in a 7 by 7 neighborhood. (Similar to a convolve op, but you must implement this yourself). All pixels greater than two thirds of the max distance from the center are set to the average of a the pixels in a 13 by 13 neighborhood. You blur shall handle the edge pixels more gracefully than the Java ConvolveOp. (Not black border)
When you complete the assignment fill in the header information at the top (Eclipse sometimes collapses this comment, so be sure to expand it.) and turn in your modified ImagesMain.java using the turnin program. This page contains instructions for using turnin. Be sure you upload the file to your CS324e folder.
Results from required filters (These examples who two drop down menu, but the actual program will have the four drop down menus):
Gaussian
Sepia Tone:
Posterize

Censor

Red Only

Color Pop (selected the orange just below the
second b on the rider on the left's right shoulder.)

Edge Blur