CS324e - Assignment 6
Placed Online: Tuesday, March 29
Due: Friday, April 15, no later than 11 pm
Points: 100, 10% of the final grade
Provided Program Files: EleBricks.java, BricksPanel.java,
ImagesLoader.java, ImagesPlayer.java, ImagesPlayerWatcher.java, Sprite.java,
various images and imsInfo.txt for your use. (All
of these files are in this jar file.)
This is an pair assignment.
You may complete the assignment with one other person from the class or you may
complete it by yourself. I strongly urge you to work with a partner. You may use the examples shown in class as a guide, but you may not
get help from anyone besides you partner, the instructor, and the TA. Copying code or getting code
from anyone besides the the instructor or TA will result in an F in the course.
You can discuss approaches to the problem with others as long as
you don't write code or look at code. You may get help on syntax errors from
others. You may refer to descriptions of algorithms (not source code) from
sources on the web or from books.
If you are working with a partner turn in one version of the
assignment to either partner's turnin account. If you work with a partner, both
student's in a pair will get the same grade on the assignment.
The purpose of the assignment is to create a game that makes use
of the Sprite class and the ImagesLoader class from the textbook.
The default game to create is the classic
Breakout,
renamed EleBricks for this assignment.
If you wish to implement a different game you must get
permission from the instructor. Email me with a description of the game. If it
is similar to a pre-existing game and a web page exists (Wikipedia is fine)
describing the game please include a link for me to follow. If doing your own
game, there must be a minimum of 3 different sprites that interact with each
other and the enclosing panel with a complexity as least as difficult as that of
EleBricks. That is the minimum for a grade of 80 on the assignment on a non
EleBricks program.. To get a score greater than 80 the game must include more
kinds of sprites with more complicated kinds of actions. Please realize doing
something other than EleBricks will be more work and I may not be able to answer
questions about your specific game.
If you want to complete a game other than EleBricks you must
email me the description of your game by 5 pm on Friday, April 1 and get a
return email from me. I will send these no later than Monday, April 4.
The rest of these instructions cover how to implement EleBricks,
Getting started:
-
Download the jar file above and save it to a convenient spot
on your system.
-
Create a new project in Eclipse. Import the archive file to
the default package. Do not create a named package for your code. (There shall
be no package line in your source code files.)
-
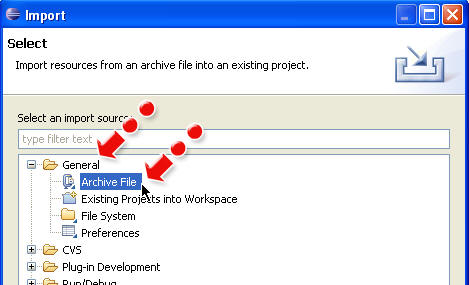
In Eclipse go to File -> Import
-
In the window that pops up expand the General option
and select Archive File
-
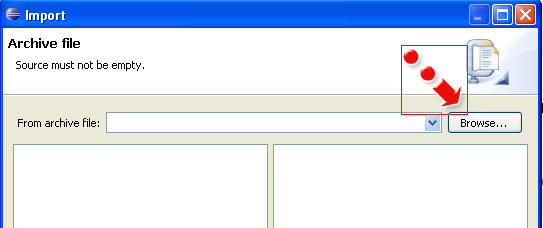
In the Import window that pops up press the
Browse... button
-
In the file choosing window that pops up, browse to the
location of the jar file you downloaded in step 1, select it, and click the
open button.
-
The .java source code files and the images folder with the
images and imsInfo.txt file that contains information for the ImagesLoader
class with the names of the images available should be added to your project.
-
You should now be able to run the program, although nothing
happens. The panel is blank.
Minimum Requirements for a Score of 80 on the EleBricks
program:
-
wall of bricks drawn using "brick" image file
-
ball drawn using "ball" image file
-
paddle drawn using "paddle" image file
-
at start of game ball starts in middle of screen and moves
down at a random angle (no trigonometry necessary, pick random value for x
direction)
-
ball bounces off of left, right, and top walls of panel
-
ball does not bounce off bottom wall of panel (it
disappears off the edge)
-
ball performs basic bounce off of paddle (y velocity
reversed)
-
when ball hits bricks they disappear
-
when ball hits bricks it bounces
-
if center (or left side) of paddle not near mouse cursor
and the mouse cursor is in the panel, paddle moves towards mouse cursor
-
paddle does not move past edges of panel
To get 100 you must complete at least 4 of the following
requirements to the game: (5 points each. You may complete one additional
requirement for 5 points extra credit.)
-
allow the player 3 total balls. When a ball goes off the
bottom of the screen if they have balls remaining a new ball is created and
play continues
-
if a player doesn't have any balls left display a game over
message
-
add a score component to the game that is displayed either
at the top of the panel or in a different component added to the frame
-
if all the bricks are destroyed, display a winning message
-
if all of the bricks are destroyed start a new level
-
add in some "tough" bricks that take 2 or more hits to
destroy
-
add in some "ball bricks" that throw a new ball into the
game when they are destroyed (multiple balls on screen at same time)
-
add in some "extra ball bricks" that grant another ball to
the player (not multiple balls on screen. More like an extra life)
-
add in some "fast ball bricks" that speed up the ball for
some set amount of time
-
add in some "duplicate bricks" that spawn a regular brick
next to them if they have an open spot
-
change the bounce behavior of the ball and the paddle (If
the ball hits near the end of the paddle it reverse x and y direction and
angle increases as well. Best if this effect is scaled, so the closer to the
end the steeper the angle. If the ball hits near the center it performs a
normal bounce.)
-
make the bricks move left and right
-
pause the game at the start to show instructions
-
when a ball appears pause for a few seconds to allow the
player to see where the ball is going to start
-
make the game easy so that whenever a ball goes off the
bottom a new ball is spawned
-
add an animation when bricks are destroyed instead of them
simply disappear. (a different sprite that doesn't interact with the ball)
-
make the ball an animated sprite that loops through
different images using the ImagesPlayer class
-
allow the player to alter the speed of the ball by pressing
a number key
-
change one of the images for the ball, brick, or paddle or
add new images
-
have the ball start out slowly, but keep speeding it up
after it hits the paddle some number of times or after some number of bricks
have been destroyed
In the header at the top of your EleBricks.java file list the
extra requirements you have completed
The basic version of the game will look like this: (A few of the
bricks have been knocked out)

Suggested Steps for Completing The Minimum Requirements
Program
Note, these are general guidelines, not detailed instructions.
You will find it useful to refer to
the documentation for the Sprite class as well as the examples from chapter
11, the BallSprite class,
the BatSprite class, and
possible BugPanel.
Don't try to code this all at once and then test. Code one
bullet as described below and then test before going on to the next.
-
Complete the requirements for the paddle:
- create a Paddle class that is a descendant of Sprite
- update the BricksPanel class to create, update, and draw a Paddle sprite
- when the mouse is moved, have the handleMouseMove method update the desired
position for the paddle
- override the updateSprite method so that the paddle cannot move past the
edges of the panel
-
Complete the requirements for the bricks:
- create a Brick class that is a descendant of Sprite
- update the BricksPanel class to create, update, and draw a couple of bricks
sprite. (Just to test the class and the image.) In the basic version of the
program Bricks do not move
- create a Wall class. (This is not a descendant of Sprite. It is used to
manage all of the Bricks.)
- the Wall class maintains a 2D array (6 rows, 10 columns per row) of Brick
objects. When constructed, fill the 2D array with Brick objects at the
various coordinates. so that a wall is completed
- add a method to draw all of the Bricks
- because bricks don't move there is no need to override the update method in
the Ball class
-
Complete the requirements for the ball: (The ball is the
most difficult part because it interacts with all of the other sprites.)
- create a Ball class that is a descendant of Sprite. The Ball needs to
have instance variables for the Wall of Bricks and the Paddle
- when a Ball is constructed place it just below the bricks and set its dx and
dy values so that it moves down. I found it best to have an instance variable
for the balls speed. Pick a random angle between 20 and 70 degrees. Convert
the degrees to radians with the Math.toRadians( ) method. The dy will be the
balls speed times the cosine of the angle and the dx will be the sine of the
angle. (More methods in the Math class to get these.)
- override the updateSprite method for the ball. The updateSprite method for
the ball is fairly complex. It must check several:
- if the ball has hit the left, right, or upper walls of the
panel it must bounce correctly. (dx = -dx for left and right walls, dy = -dy
for top wall)
- if the ball has hit the paddle and is moving down it must
reverse direction to move up (dy = -dy)
- the Ball needs to check with the Wall to see if it hit any
bricks. (This is a new method for the Wall class. If a brick was hit its
setActive( ) method must be called with a parameter of false.) It is easiest
to use the balls rectangle from the getRectangle method and each Bricks
rectangle. There is a method in the Rectangle class name intersects(Rectangle
r). This is an easy way to see if the ball has collided with a Brick.
- first just get the ball to make bricks disappear when it
hits them. Don't worry about bouncing off the bricks at first.
- when you have the bricks disappearing when the ball hits
them go back and make the ball bounce off the brick it hit. Getting this right
is tricky because the ball could bounce off the side of the brick which alters
it dx or it could bounce of the top or bottom of the brick which alters its dy.
When you complete the assignment fill in the header
information at the top of the EleBricks.java class. (Eclipse sometimes collapses this comment, so be sure to
expand it.) If you are doing a game other than EleBricks be sure to include a
header at the top of you class that has the main method and ensure that class
has Main in its name.
Because there are so many files you will turn in a jar file with
your source code and the images folder with imsInfo.txt and all of the image
files your program uses. This is not an executable jar, simple an archive, like
a zip file.
Refer to this page and follow the instructions carefully to create your jar
using Eclipse. The jar shall be named A6.jar. (If you are unable to create a
jar, but you can create a zip, you can turn in a zip file with your code and the
folder with all of the images data..) Turn in the jar using the
turnin program.
This page contains instructions for using turnin. Be sure you upload the
file to your CS324e folder.