


Table of contents
- Introduction
- Open a CMD prompt
- Creating a key
- Copying your key to a server
- Using ssh-agent (optional)
- Additional information
For instructions on adding SSH keys for other platforms, visit this FAQ.
Introduction
As of April 12, 2019, SSH keys are required when SSHing to CS/CSRES networks when outside of our networks, campus wireless, or the VPN. The University ISO will quarantine any host allowing SSH access that has not disabled password authentication.
An SSH key pair consists of two keys: One public key and one private key. The public key, as the name suggests, is public and can be safely shared with the world. The private key should never be shared with anyone and should be kept safe.
In order to use SSH keys to connect to a remote computer, one must first create an SSH key pair on one's computer, then copy the public SSH key to the remote computer. You will create an SSH key pair on each computer that you want to SSH from. You can use the same public SSH key from one computer to connect to many others.
E.g., if you have two computers at home, home1 and home2, and want to use them to connect to remote1, remote2, and remote3 you would create an SSH key pair on both home1 and home2, and then send the public key from home1 to all three remote computers, and lastly you would send the public key from home2 to all three remote computers.
Below are the necessary instructions to create an SSH key pair and add your public key to your CS account. Adding your public SSH key to linux.cs.utexas.edu will automatically add it to all other machines on the CS network. For the purposes of these instructions, we will assume that you want to SSH into a CS machine from a computer at home. To avoid confusion, we will use the following terminology:
HOME = Your home computer
CS_USER = Your CS username
linux.cs.utexas.edu = The machine that you need to SSH into and add an SSH key to.
NOTE: All commands will be run on HOME.
Creating a key
To create a 4096-bit RSA key, run the following:
ssh-keygen -t rsa -b 4096- Press Enter to use the default location. (Recommended) 1
- Enter a passphrase (ALWAYS use a passphrase!!) 2 3
- Enter your passphrase a second time.
It should look something like this:

Your public SSH key is located by default at ~/.ssh/id_rsa.pub and is perfectly safe to be shared with anyone.
Your private SSH key will be located by default at ~/.ssh/id_rsa. You should NOT touch this file or share it with anyone.
Copying your key to a server
From UT VPN, UT wireless, or CS network
If you are connected to UT VPN, or have brought your machine on campus and have connected to UT wireless or the CS network, then you can use one of the methods below. If for any reason the ssh-copy-id method does not work, you can still copy your public SSH key manually using the second method.
You can find more information on how to connect to UT VPN by visiting this page.
Using ssh-copy-id
To copy your SSH public key from HOME to linux.cs.utexas.edu, simply replace the ssh in a normal SSH command with ssh-copy-id, as shown below:
ssh-copy-id CS_USER@linux.cs.utexas.edu- If you see the text "Are you sure you want to continue connecting (yes/no)?" type
yesand press Enter. - Enter CS_USER's password to send your public key to the server.
It should look something like this:
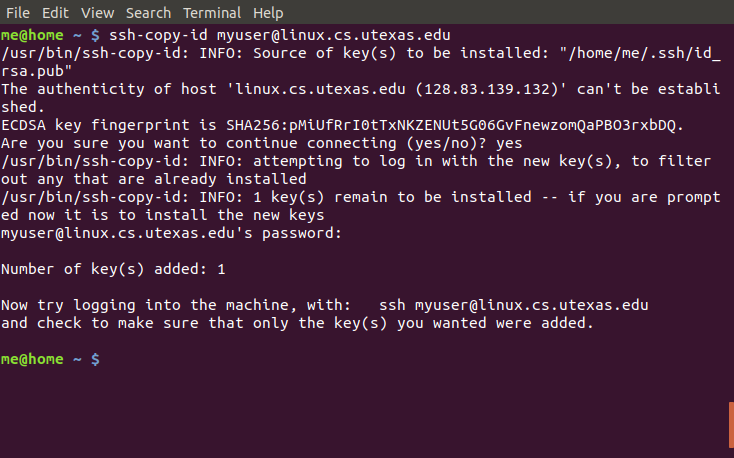
Congratulations! You can now use your SSH key to log into any CS machine that you have access to!
Using the manual method
If for any reason the ssh-copy-id method does not work, you can still copy your public SSH key manually.
cat ~/.ssh/id_rsa.pub | ssh CS_USER@linux.cs.utexas.edu "umask 0077 && mkdir -p ~/.ssh && cat >> ~/.ssh/authorized_keys"- If you see the text "Are you sure you want to continue connecting (yes/no)?" type
yesand press Enter. - Enter CS_USER's password to send your public key to the server.
From off-campus
Copy to a USB drive
If you are unable to connect to UT VPN or cannot bring your machine to campus, then copying your public SSH key to a USB drive is another solution.
On your home computer:
- Plug in a USB drive.
- If it does not auto-mount, open a file manager and open the USB device to view its contents.
- In a terminal, run
df -hTto find the full path to your mounted USB drive. (Your USB's mountpoint path will likely start with/media/yourusername) cp ~/.ssh/id_rsa.pub /media/yourusername/directory/(Replace the second path with your real USB drive's mount point path)- Safely unmount/eject your USB drive and bring it to campus.
From here, you will want to log into a CS lab machine and do:
- Plug in the USB drive
- If it does not auto-mount, open a file manager and open the USB device to view its contents.
- In a terminal, run
df -hTto find the full path to your mounted USB drive. cat /media/yourusername/directory/id_rsa.pub >> ~/.ssh/authorized_keys(Replace the second path with your real USB drive's mount point path)chmod 700 ~/.ssh && chmod 600 ~/.ssh/authorized_keys- If step #5's command gives any errors, please submit a helpreq.
- Safely unmount/eject your USB drive.
Using ssh-agent (optional)
ssh-agent is a program included in OpenSSH that will remember your SSH key and not require you to type its passphrase each time you use SSH. Your desktop environment on HOME should start up ssh-agent when you log in.
-
To add your SSH key to the agent, simply type:
ssh-add -
Type in your SSH key's passphrase and you're good to go!
You won't need to type in your passphrase any longer. Once you log out ssh-agent will be killed and you will need to repeat the above process the next time you log in.
Additional information
-
If you choose to not use the recommended location for your private key, you will need to specify its location in either your
sshcommand (with -i) or after yourssh-addcommand if using ssh-agent.↩ -
This is not your CS_USER's password. The passphrase that you choose for your SSH key should be different from your CS_USER's password. See Selecting a strong password to learn how to choose a secure passphrase instead of a password.↩
-
When typing your passphrase, you won't see any output on your screen. This is normal and is for your security.↩